
Generally these days Multi step form is used more than general form we see on many website.
In this tutorial, we will see how to create a simple multi-step form using JavaScript and CSS.
Before proceed to make it a multi-step form we have to create a simple form with HTML. After form creation with the use of JavaScript and CSS, we make it a multi-step form.
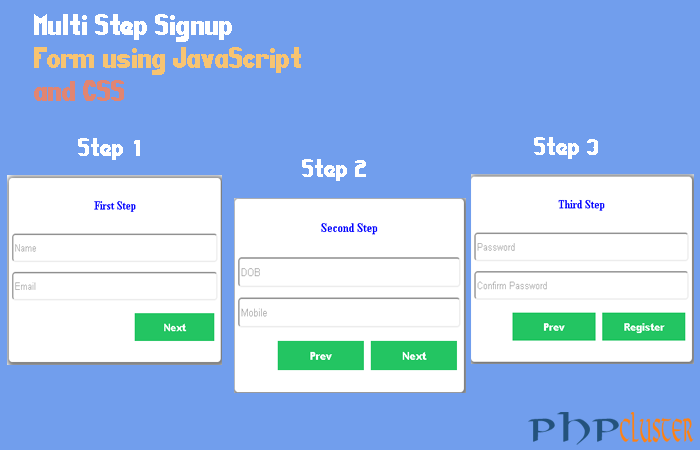
In this tutorial, we will create a simple multi-step registration form with 3 steps but only 1st step will be visible by default Form have three fieldsets for three different steps.
Multi steps are as follows:
Step 1: for name and email
Step 2: for DOB and mobile no
Step 3: for password and confirm password
Demo
Table of Contents
HTML
<center>
<form action="#" method="GET">
<h1>Signup form</h1>
<fieldset id="first">
<h4>First Step</h4>
<input type="text" name="name" id="name" placeholder="Name"><br>
<input type="text" name="email" id="email" placeholder="Email"><br>
<input type="button" name="name" onclick="next()" value="Next"><br>
</fieldset>

<fieldset id="second">
<h4>Second Step</h4>
<input type="text" name="dob" placeholder="DOB"><br>
<input type="text" name="mobile" placeholder="Mobile"><br>
<input type="button" name="firstnext" onclick="last()" value="Next">
<input type="button" name="previous" onclick="prev()" value="Prev">
</fieldset>

<fieldset id="third">
<h4>Third Step</h4>
<input type="password" name="pass" placeholder="Password"><br>
<input type="password" name="cpass" placeholder="Confirm Password"><br>
<input type="submit" name="register"  value="Register">
<input type="button" name="firstprevious" onclick="fprev()" value="Prev">
</fieldset> </form>
 </center>
JavaScript
<script src="jquery.js"></script>
<script>
function next(){
document.getElementById('first').style.display = "none";
document.getElementById('second').style.display = "block";
}
function prev(){
document.getElementById('second').style.display = "none";
document.getElementById('first').style.display = "block";
}
function last(){
document.getElementById('second').style.display = "none";
document.getElementById('third').style.display = "block";
}
function fprev(){
document.getElementById('third').style.display = "none";
document.getElementById('second').style.display = "block";
}
</script>
CSS
<style>
fieldset
{
   display:none;
   width:320px;
   height: 235px;
   border-radius:5px;
   padding:5px;
   margin:10px;
   box-shadow:2px 2px 8px 5px grey;

}
#first{
    display:block;
    width:320px;
    height: 235px;
    border-radius:5px;
    padding:5px;
    margin:10px;
   box-shadow:2px 2px 8px 5px grey;
}
input[type="text"] {
    width: 100%;
    height: 38px;
    padding: 2px;
    border-radius: 5px;
    margin: 6px 41px 7px 0px;;

}
input[type="password"] {
    width:  100%;
    height: 38px;
    padding: 2px;
    border-radius: 5px;
    margin: 6px 41px 7px 0px;;

}
input[type="submit"] {
    width: 124px;
    float: right;
    padding: 9px;
	margin:10px 5px;
    background: #23c562;
    color: #fff;
    font-weight: 900;
    border: none;
}
input[type="button"] {
    width: 124px;
    float: right;
    padding: 9px;
    margin:10px 5px;
    background: #23c562;
    color: #fff;
    font-weight: 900;
    border: none;
}
 h4{
    color:blue;
 }
h1{
    color: red;
}
</style>
[sociallocker]Download[/sociallocker]
That’s it. Simple steps to create multi step form with JavaScript and CSS. If you liked this article 🙂 please share with your friends and colleagues 🙂 . If you have any query feel free to write in comment box.